How to set up Google Analytics 4 with Spektrix
In this article, we’ll make it really easy for you to do the basics of setting up Google Analytics 4 with Spektrix.
As well as a set of instructions, we’ve created a template Google Tag Manager container to simplify things and help you get started quickly.
In the GTM container you’ll find:
GA4 configuration tag for recording page views and more. If you’ve enabled enhanced measurement in GA4 then you’ll also capture file downloads, plays of YouTube videos, clicks away from your site, and more.
Purchase tag to record information about transactions, with the amount spent and the products bought.
Data layer variables that will pick up the sort of ecommerce data that you’ll need for other tags (eg the Meta pixel, Google Ads tags, and others). We’ve included ‘transaction_id’, ‘value’, and ‘items’.
Follow these instructions and you’ll be up and running in no time, recording page views, purchases and other useful website interactions.
There’s no charge. But please ping us an email or tag us on social media (Twitter or LinkedIn) if you make use of this because it’s nice to know.
Let’s get going.
1. Set up a GA4 property
There’s no sense in us explaining how to do this, so follow Google’s own instructions instead.
You’ll be given a Measurement ID for your GA4 property. Make a note of this (or remember where it is for Step 3).
A few pointers:
Create the GA4 property in your existing Google Analytics account. It’ll sit alongside your existing ‘Universal Analytics’ property (assuming you have one)
Don’t set up separate properties for your main website and for Spektrix. Data from all of the various parts of your online presence should live in the same property (with the exception of any microsites or Intranet that might sit separately to your main website)
Make sure that more than one person has admin access to the account (including a generic address like digital@yourorg.com). Please also use a password manager for all of your passwords. We like 1Password.
2. Import our template
Click the button below to download a JSON file (it’s like a fancy text file) containing a set of standard tags, triggers, and variables.
Then go to your Google Tag Manager account and select your container then:
Click on Admin and then ‘Import Container’
Click on ‘Choose container file’ and select the JSON file you’ve just downloaded
Click the button for New workspace and, in the flyout, change the name from ‘Untitled Workspace’ to ‘Import GA4 tags’
IMPORTANT: Choose ‘Merge’ and not ‘Overwrite’ or you’ll find any existing tags will disappear
Follow the rest of the instructions on the screen and, when done, your Overview page should look something like this…

NB: these instructions are written on the assumption that you don’t already have any GA4 tags in your GTM container. If you do then you’ll need to either clear those out or make them play nicely with these new ones.
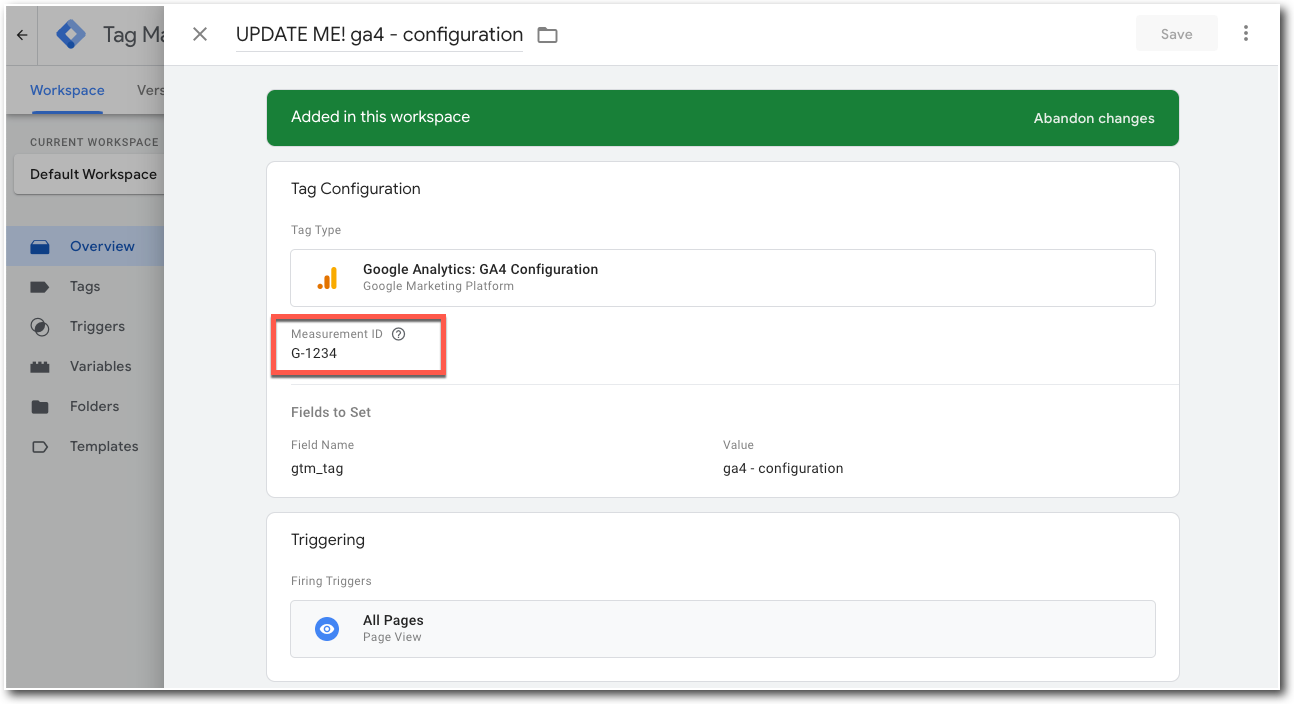
3. Update the configuration tag
Click on the tag called ‘UPDATE ME! ga4 - config’. You’ll need to:
Replace the current placeholder Measurement ID (currently G-1234 - see the red box in the screenshot below) with your own - remember that from Step 1?
Edit the name of the tag to remove the ‘UPDATE ME!’. It might be obvious but we didn’t want you to miss that bit.
4. Test and publish the container
Before publishing tags in Google Tag Manager you should always (always) test them. There shouldn’t be anything wrong with the tags we’re providing (we’re the experts at this stuff, after all) but it’s best to be sure.
If you’re not sure how to preview tags in GTM you can check out our course on Coach called Google Tag Manager Essentials. In fact, the lesson on previewing and submitting changes is now free to view.
Additional steps
Depending on your website setup, there might be some extra things to do. You also need to tweak a few settings in GA4.
Settings in GA4
We’re not going to go through this exhaustively, but two important things to look at are:
referral exclusions (add the URLs for any payment gateways, queueing systems, or spammy voucher sites that show up in your Referral reports)
data retention, which is set to 2 months by default and can be extended to 14 months (don’t worry - most data will be retained for longer. This mostly applies to the raw data which you only really access when doing very specific querying in the Explore reports)
Google Tag Manager
If you’re not already using GTM then you really should be. Go to tagmanager.google.com and set up a free account. Then create a GTM container and follow the steps above to import your tags.
You’ll need to add this container to your website and Spektrix. Get the code from Admin > Install Google Tag Manager and then:
For your website: send it to your developers in a Word doc or .txt file (email clients can do funny things to code) or add it to the site yourself if you know how.
For Spektrix: follow the instructions here.
If you already have any GA4 tags on your website you should remove them. Having them on your site and in GTM will cause double counting of data and make a mess. You should move any other analytics or advertising tags into the GTM container at some point too.
Privacy and Cookie consent
You may need to update either the cookie policy and/or privacy policy on your website to mention that you’re using Google Analytics 4.
If you’re using a cookie consent manager then you might also need to take some additional steps to make your tags pay attention to your users’ privacy preferences. Google Analytics 4 has a feature called ‘Consent Mode’ which will work with some cookie consent tools which may be worth a look.
Tricky web technologies
Your website might include some technology to make it load faster, or to show content dynamically (without requiring a whole new page to be loaded). This can sometimes trip up analytics, so if you see some weirdness in your numbers then this could be the issue (get in touch for help).
Ok, I’ve got some tags in place. What next?
Collecting data is just the first step.
Reporting
The reports that come with GA4 aren’t great. With Universal Analytics, there were dozens of pre-existing reports to pick through looking for useful information. With GA4 you’re expected to set up the reports that matter to you.
We know a blank slate can be a bit daunting so we’ve got you covered here too with a set of standard GA4 reports that we’ve developed. We have two options:
DIY: we’ll soon be making a set of comprehensive report-building instructions available via Coach, our online training platform
Done for you: if that’s not a good use of your time, we can get everything configured on your behalf. Get in touch for a quote
If you have more complex reporting needs we can also create custom reports for you, including dashboards using Looker Studio (previously called Google Data Studio).
Training
We can deliver sessions showing your team how to get the most out of GA4. Starting with a general overview of the tool, and then taking deeper dives into relevant areas, such as understanding marketing campaigns and website performance.
(NB: you really need to have set up a basic level of reporting before it makes sense to train your team on GA4).
Additional tracking
The setup we’re giving you here will give you a solid foundation of pageviews, enhanced measurement, and ecommerce tracking.
But you may want to take things further by tracking things like form submissions, what’s on filters, error messages, SYOS interactions, other types of conversions, and more.
If that’s something you’d like a hand with then get in touch.